模型设计

Notify
id          : {type: 'integer', primaryKey: true},      // 主键
content     : {type: 'text'},   // 消息的内容
type        : {type: 'integer', required: true, enum: [1, 2, 3]},  // 消息的类型,1: 公告 Announce,2: 提醒 Remind,3:信息 Message
target      : {type: 'integer'},    // 目标的ID
targetType  : {type: 'string'},    // 目标的类型
action      : {type: 'string'},    // 提醒信息的动作类型
sender      : {type: 'integer'},    // 发送者的ID
createdAt   : {type: 'datetime', required: true}
Save Remind
消息表,我们需要target、targetType字段,来记录该条提醒所关联的对象。而action字段,则记录该条提醒所关联的动作。
比如消息:「小明喜欢了文章」
则:
target = 123,  // 文章ID
targetType = 'post',  // 指明target所属类型是文章
sender = 123456  // 小明ID
Save Announce and Message
当然,Notify 还支持存储公告和信息。它们会用到content字段,而不会用到target、targetType、action字段。
UserNotify
id          : {type: 'integer', primaryKey: true},      // 主键
isRead      : {type: 'boolean', required: true},
user        : {type: 'integer', required: true},  // 用户消息所属者
notify      : {type: 'integer', required: true}   // 关联的Notify
createdAt   : {type: 'datetime', required: true}
我们用 UserNotify 来存储用户的消息队列,它关联一则提醒(Notify)的具体内容。 UserNotify 的创建,主要通过两个途径:
1.遍历订阅(Subscription)表拉取公告(Announce)和提醒(Remind)的时候创建2.新建信息(Message)之后,立刻创建。
Subscription
target      : {type: 'integer', required: true},    // 目标的ID
targetType  : {type: 'string', required: true},    // 目标的类型
action      : {type: 'string'},   // 订阅动作,如: comment/like/post/update etc.
user        : {type: 'integer'},
createdAt   : {type: 'datetime', required: true}
订阅,是从 Notify 表拉取消息到 UserNotify 的前提,用户首先订阅了某一个目标的某一个动作,在此之后产生这个目标的这个动作的消息,才会被通知到该用户。 如:「小明关注了产品 A 的评论」,数据表现为:
target: 123,  // 产品A的ID
targetType: 'product',
action: 'comment',
user: 123  // 小明的ID
这样,产品 A 下产生的每一条评论,都会产生通知给小明了。
SubscriptionConfig
action: {type: 'json', required: true},   // 用户的设置
user: {type: 'integer'}
不同用户可能会有不一样的订阅习惯,在这个表中,用户可以统一针对某种动作进行是否订阅的设置。而默认是使用系统提供的默认配置:
defaultSubscriptionConfig: {
  'comment'   : true,    // 评论
  'like'      : true,    // 喜欢
}在这套模型中,targetType、action是可以根据需求来扩展的,例如我们还可以增加多几个动作的提醒:hate被踩、update被更新....诸如此类。
配置文件 NotifyConfig
// 提醒关联的目标类型
targetType: {
  PRODUCT : 'product',    // 产品
  POST    : 'post'    // 文章
},

// 提醒关联的动作
action: {
  COMMENT   : 'comment',  // 评论
  LIKE      : 'like',     // 喜欢
},

// 订阅原因对应订阅事件
reasonAction: {
  'create_product'  : ['comment', 'like']
  'like_product'    : ['comment'],
  'like_post'       : ['comment'],
},

// 默认订阅配置
defaultSubscriptionConfig: {
  'comment'   : true,    // 评论
  'like'      : true,    // 喜欢
}
服务层 NotifyService
NotifyService 拥有以下方法:
•createAnnounce(content, sender)•createRemind(target, targetType, action, sender, content)•createMessage(content, sender, receiver)•pullAnnounce(user)•pullRemind(user)•subscribe(user, target, targetType, reason)•cancelSubscription(user, target ,targetType)•getSubscriptionConfig(userID)•updateSubscriptionConfig(userID)•getUserNotify(userID)•read(user, notifyIDs)
各方法的处理逻辑如下:
createAnnounce(content, sender)
往 Notify 表中插入一条公告记录
createRemind(target, targetType, action, sender, content)
往 Notify 表中插入一条提醒记录
createMessage(content, sender, receiver)
1.往 Notify 表中插入一条信息记录2.往 UserNotify 表中插入一条记录,并关联新建的 Notify
pullAnnounce(user)
1.从 UserNotify 中获取最近的一条公告信息的创建时间: lastTime2.用lastTime作为过滤条件,查询 Notify 的公告信息3.新建 UserNotify 并关联查询出来的公告信息
pullRemind(user)
1.查询用户的订阅表,得到用户的一系列订阅记录2.通过每一条的订阅记录的target、targetType、action、createdAt去查询 Notify 表,获取订阅的 Notify 记录。(注意订阅时间必须早于提醒创建时间)3.查询用户的配置文件 SubscriptionConfig,如果没有则使用默认的配置 DefaultSubscriptionConfig4.使用订阅配置,过滤查询出来的 Notify5.使用过滤好的 Notify 作为关联新建 UserNotify
subscribe(user, target, targetType, reason)
1.通过reason,查询 NotifyConfig,获取对应的动作组:actions2.遍历动作组,每一个动作新建一则 Subscription 记录
cancelSubscription(user, target ,targetType)
删除user、target、targetType对应的一则或多则记录
getSubscriptionConfig(userID)
查询 SubscriptionConfig 表,获取用户的订阅配置
updateSubscriptionConfig(userID)
更新用户的 SubscriptionConfig 记录
getUserNotify(userID)
获取用户的消息列表
read(user, notifyIDs)
更新指定的 notify,把 isRead 属性设置为 true
时序图
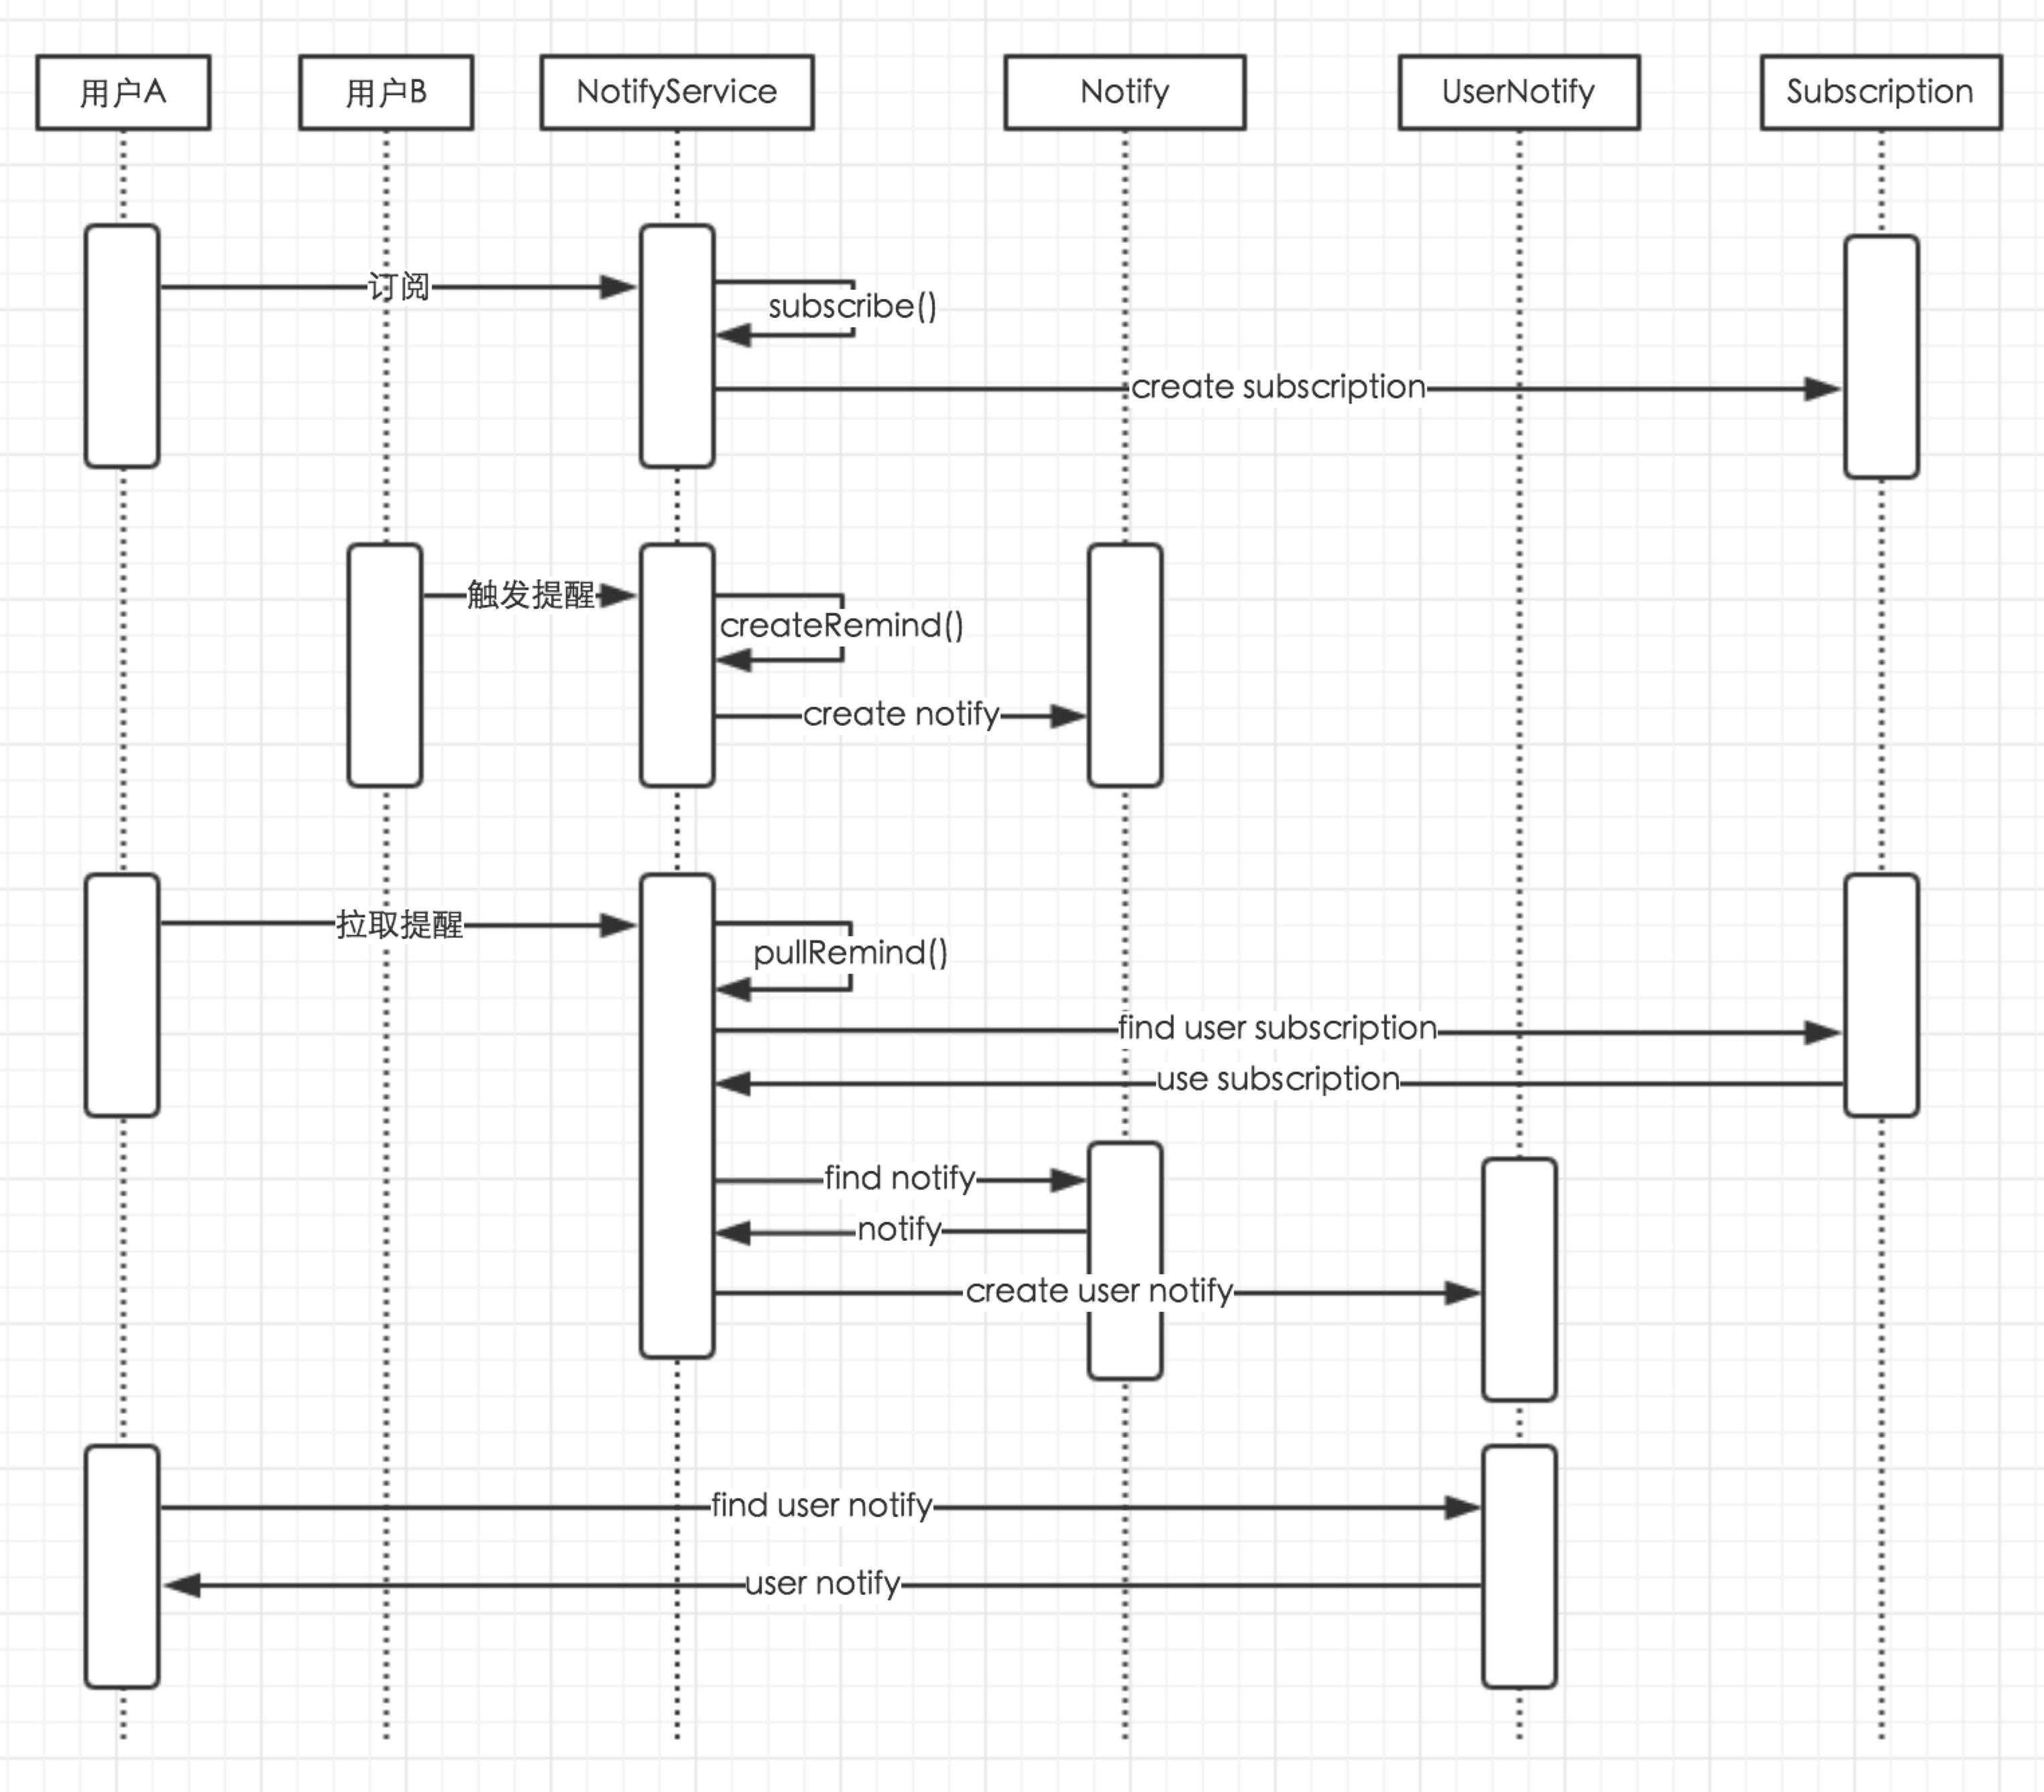
提醒的订阅、创建、拉取

我们可以在产品创建之后,调用NotifyService.subscribe方法,
然后在产品被评论之后调用NotifyService.createRemind方法,
再就是用户登录系统或者其他的某一个时刻调用NotifyService.pullRemind方法,
最后在用户查询消息队列的时候调用NotifyService.getUserNotify方法。
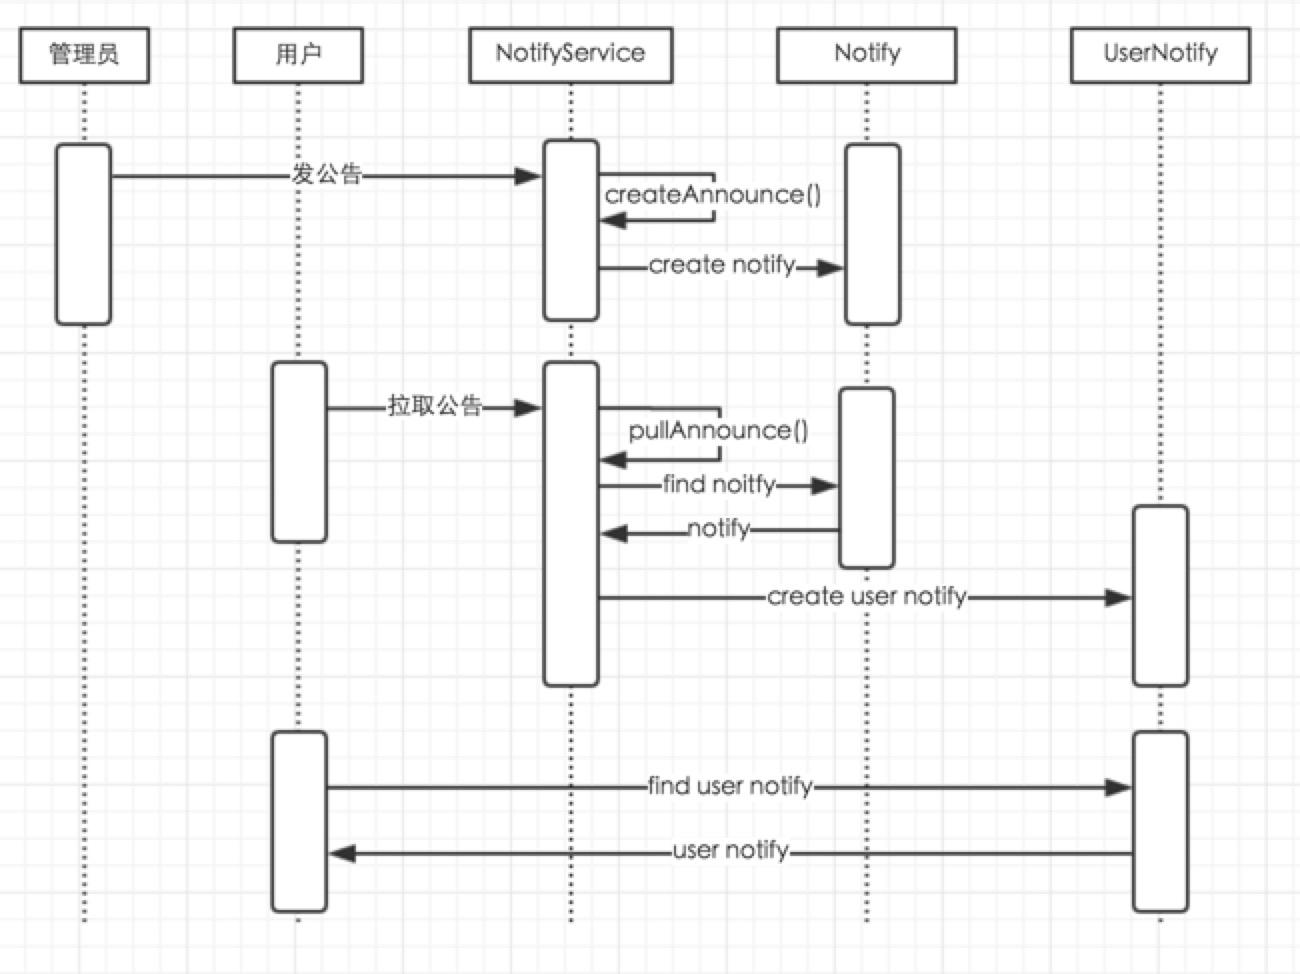
公告的创建、拉取

在管理员发送了一则公告的时候,调用NotifyService.createAnnounce方法,
然后在用户登录系统或者其他的某一个时刻调用NotifyService.pullAnnounce方法,
最后在用户查询消息队列的时候调用NotifyService.getUserNotify方法。
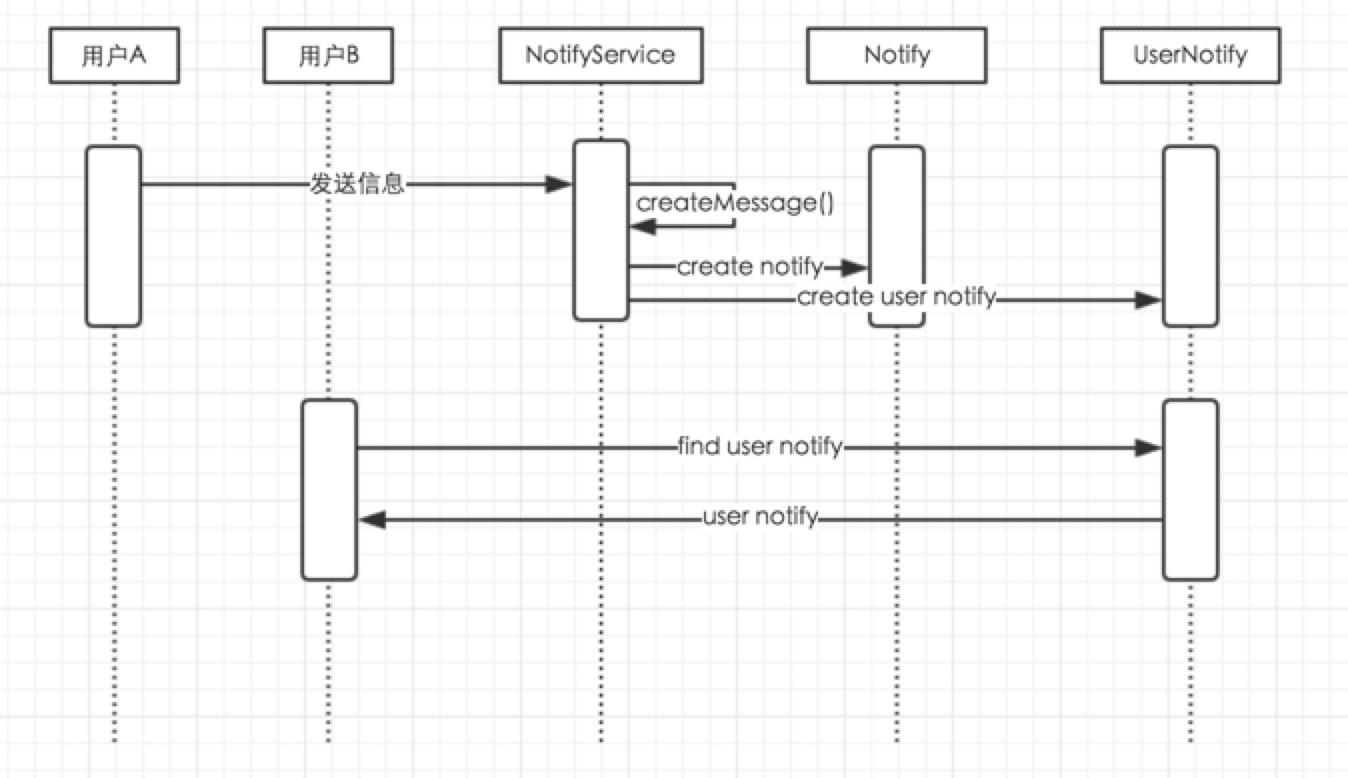
信息的创建

NotifyService.createMessage方法就可以了,
在下一次用户查询消息队列的时候,就会查询这条信息。

评论 (0)